Have you been constantly noticing tracks or blotches of ink on your printouts every time you are using your Brother printer? Then it is time to make sure your printer drum is in a good state. Any device that we buy is composed of various parts that need maintenance every now and then. The printer drum in your Brother printer is an important part. It appears as a rolling drum-like structure that has several bands of letters and numbers. It also comprises one print hammer for each column and ribbon. The ribbon facilitates the smoother movement of the paper on which printing is done.
If you have been wondering how to clean Brother printer drum, then this article will help you out. In order to remove the problem of improper printouts, you have two options, either clean your printer drum unit or replace it. The replacement will cost you a good amount of money, so cleaning it will prove to be an affordable and smartest solution. The drum is the key component of your Brother printer and needs regular maintenance. So, keep reading to find the easiest guide on How to clean Brother printer drum without any inconvenience.
What Is Brother Printer Drum?
A printer drum is present in the inkjet printers only and not in the laser printers. We are aware that, unlike laser printers, inkjet printers work on different mechanisms. The inkjet printer produces printed hard copies with finer resolutions between 300 to 600 dots per inch. The inkjet printer has many ink tubes that have many minute inks ejecting nozzles. The nozzles shoot out the ink directly on the sheets.
A printer drum comprises three components, the cylindrical drum itself, a print hammer for each column, and a sliding ribbon. The hammer pushes the paper that is being printed into the type slug. The paper is rotated around so that its position fits perfectly with that of the letters and numbers. The hammer hits the paper which is being printed from behind, and meanwhile, the printer drum rotates to position the desired character correctly in the right place. The hammer is also pushed into the sliding ribbon and onto the character that is being printed.
Since every time you print, the printer drum is likely to get a little botched over a period of time due to repeated usage. The images and texts are printed with the help of this printer drum. Hence maintaining it is often of utmost importance to get better quality hard copies.
Printer Drum vs. Toner Cartridge (Brother Printer Drum Units Comes Separate)
People often get confused between the printer drum and the toner cartridge. And in most cases, they use both of them interchangeably, but they are different parts of the printer, and both of them perform very different functions. So, before you learn how to clean the Brother printer drum, it is very important that you are sure beforehand which component we are exactly discussing.
Both printer drum and toner cartridge are very important for printing. The toner cartridge is the container in the Brother printer that holds the toner powder. The printer drum, on the other hand, is the electrically powered cylinder that helps in fusing the toner powder onto the paper that is being printed to create texts and images on it.
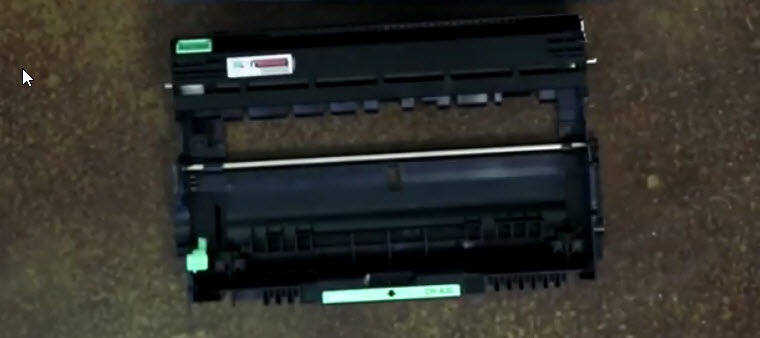
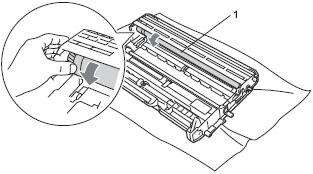
The below image depicts what a printer drum looks like:
The image below shows what a toner cartridge looks like:
The Brother laser printers have separate cartridge toner and printer drum units. The Brother printers come with smart technology, so your printer will inform you when your printer drum needs to be replaced. On average, you will have to replace the drum after the use of three to four toners. You will notice black spots on your printed hard copies, which is a sign that it is time to either replace or thoroughly clean your printer drum.
How To Clean Brother Printer Drum: Easy Step-By-Step Guide
Just follow the steps and important notes given to you below to clean the Brother printer drum with ease:
IMPORTANT NOTES POINT:
Before we start with the step-by-step guide on how to clean the Brother printer drum, the following are the important points you have to keep in your mind:
- The manual cleaning process provided will require either a medical alcohol swab which is easily available at drugstores. You can also lightly moisten the cotton swab.
- The cleaning process may be repeated several times to remove foreign particles stuck on the printer drum. But don’t overdo it in case a certain particle stuck on it is not coming off. In that case, you will have to replace it with a new one.
Automatic Process
To clean Brother Printer Drum by the automatic cleaning process, just follow the steps given below:
- First, make sure that your printer is in Ready mode by pressing the “GO” button. Meanwhile, keep an A4 sheet readily available.

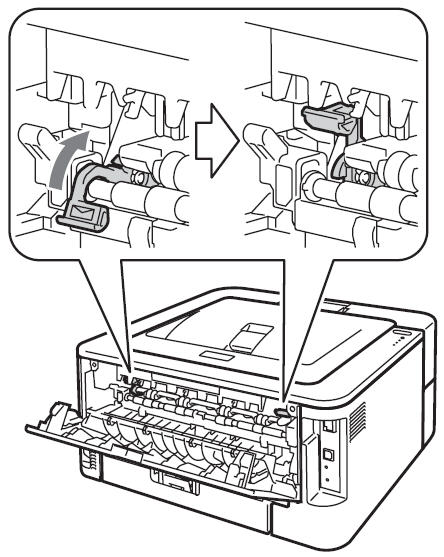
- Then open the front and back cover and press the “GO” button five times.
- After that, close the front cover, and your printer will prepare the drum cleaning process. You will also notice that the “Ready LED” will turn on.
- Once the light of the “Ready LED” is turned on, open the cover of the manual feeder slot.
- Now, with the help of both hands, set the manual feed paper slot in accordance with the width of your sheet. Then put the A4 sheet in the manual paper feeder slot until the top edge of the A4 sheet touches the paper feed roller. You will feel that the machine is pulling in the paper, let your A4 sheet go.

- After that, the machine will start the printer drum cleaning process, and the “Ready LED” light will start flashing.
- Lastly, when the machine has finished to clean Brother printer drum, it returns to Ready mode.
Manual Process
Follow the steps given below to clean the Brother printer drum using the manual procedure:
- Turn off your Brother printer and unplug it from the power wall outlet.
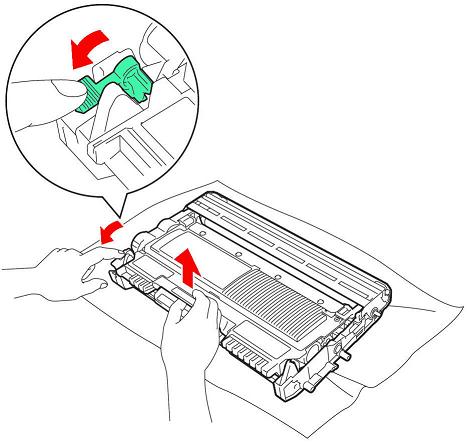
- Remove the drum and toner assembly after opening the front cover.

- Hold down the green lock lever present on the left side of the printer drum to remove the toner cartridge out.
- Now, take the hard copy of the printed material that you found blotched or smothered around while you were using the printer without cleaning. Take that printed paper sample and place it in front of the drum unit. This will help you find out the area that is causing the trouble.
- After you have found the fault spot, or if you haven’t rolled the drum completely to make sure if there is any excess mark or material on the surface of the printer drum.
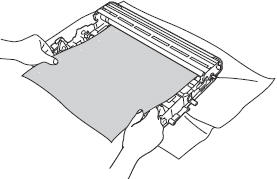
- Then, gently clean the surface of the printer drum roller using either a moistened cotton swab or a medicinal alcohol swab. This will make sure that your printer drum gets rid of any foreign material that is causing trouble.
Lastly, when you are done cleaning the drum, make sure the surface is dry. Put everything back together tightly, and voila, you have successfully cleaned your Brother printer drum. Take a few test printouts, and you are good to go.